Thursday, November 24, 2016

Fly High To Inspire !!


Hi friends ...Its Vijaylaxmi Siyal here !! How you all are doing ?? Today i am sharing 3 simple cards using Old & New releases both..!! 😃 So here are my cards -

First card - 

 
Steps - For this card i used Die Cut Inlaid Technique ..Inlaid the Beautiful Butterfly die cut from PABD's Heart Butterfly Die in gold on the PABD's Stitched Bubbles Edge Die cute panel !! Put a red card stock beneath this white layer for some interest & pop of color !! Finally die cut the Word Inspire in same Gold Coloured paper from PABD 's Word Die. Its done !!

PABD Products Used for this card - 

Heart ButterflyStitched Bubbles  inspire


Second card -

  Steps - This one is made with my most favourite Heat Emboss Resist technique !! For this card i Heat embossed the PABD's Mandala Stamp Set in white EP and then using 3 colors of DI from our Challenge Mood-board distressed the whole panel !! 
For sentiment i used the PABD's Thank you Stamp Set !! Heat embossed in black on vellum strip and added some die cut left over hearts from butterfly die to create some wow factor !! 


PABD Products Used for this card - 

mandala      


Third Card - 


Steps - This one is the simplest card ..though i am not much stencil savvy but trying to use my best  of skills :p 
I simply use the pallet of our recent challenge's Mood - Board and distressed the white card stock with those DI ...then added the Vellum panel die cut from PABD's Rounded Rectangle Stitched Die and over that heat embossed the sentiment from PABD's Positive Vibes Stamp Set in Black. For finishing touch added some Turquoise Enamel Dots from the PABD Store. Simple and quick to go !! 


PABD Products Used for this card - 

                  Turquosie   ABSTRACT TRIANGLE

                          Positive Vibe   Dual Stitched Rounded Rectangle

I hope you liked the cards i made for you ..here is a glimpse of all 3 together !! 


And yes here is the beautiful mood - Board from our ongoing challenge # 12 -


Don't forget to participate and do check all the guidelines before entering the challenge !! 

Hugs..

Vijaylaxmi Siyal.

Tuesday, October 18, 2016

Mobile Case Tutorial + 1 CAS Card !!

Hi friends ..this is Vijaylaxmi Siyal this side !! Yeah i know i am MIA since long but there are so many reasons for being that..!! Anyways keep this story aside and lets talk craft .. :) I really missed craft this time and believe me its very hard to get back and bring that mojo back ...i struggled a lot this time while creating these projects so pls bear me with my silly creations..!! hope you like them !!


So lets move ahead -


Here is the -- Felt Mobile Case !!


Step 1 : Take Felt Sheets as per your choice of colors... i chose Black , Red & Lemon Green.


Step 2 : Cut the Black outer most sheet using PABD Dual Leaf die.


Step 3 : Now stick the Green felt sheet beneath the die cut black sheet for some pop of colors ..i used Fabric Glue here to stick both sheets.


Step 4 : Now cut some red leaves from the same die and place them in the negative die cut space black felt sheet.


Step 5 : Stick all the leaves with the help of Fabric glue & let them dry completely..You can see the glue in my pics :p


Step 6 : Now take some Red Embroidery thread and stitch both the front & back black felt sheets together. I am not in stitching much so don't know the name of this stitch :p  we are done ...!! Easy right ...?? If you want you can add a button or strap to make it more secure ...i am going to do that soon.


PS - I would like to thank Jasleen for inspiring me with her amazing Felt Creations..!! 


Products i used for this Project from Peek-a-Boo Designs -


Now move on to the next card in which i used Inlaid Die Cutting for the first time ..& really find it so cool !!


Steps - 
1) For this card i distressed a white card stock  with some random colors of DI and then Die Cut them using the October Released Swirled Flourish Die & Thank You die 
2) Then Cut another white CS panel using Rounded stitched Rectangle Die .
3) Then placed the Flourish Die & Thank you Die on this stitched white CS in a pattern and run thru it from the Big Shot.
4) Now comes the tricky but fun part is to arrange all the colored die cut pieces to this white die cut piece. Its just like solving a puzzle ...!! So fit all the pieces in the negative spaces . Placced some matching PABD Enamel Dots here n there for more charm.
5) Tadda ..!! We are done ..its ready ..sweet n simple  !! Quick too :p


Products i used for this Project from Peek-a-Boo Designs -


Thank you all for stopping by ..!!

hugs..
Vijaylaxmi Siyal

Thursday, September 8, 2016

Sparkle & Shine !!

Hi Friends...Its Vijaylaxmi here !! Today I am sharing three very simple cards so let's start -


 Card - 1


Steps -

1) Took a card stock (neenah classic ) ...Distressed it with three different DI to create ombre BG !!
2) Then using Peek-a-boo Indian Motif stamp set ..I heat embossed one of the Paisley in gold on the whole panel ..and filled the rest space with small stamps from the same set !! 
3) Then Cut the whole panel with Peek-a-boo Rectangular stitched die !!
4) Cut the word Celebrate in gold using September released Celebrate Word Die from Peek-a-boo Designs. Also added a heat embossed sentiment from Peek-a-boo Happy Deepawali Stamp set below this word to complete the greeting !!
5) Arranged  everything on a black card stock as a base and its finish !!
6) I just love this stamp set as it is so opt for our Indian festivals !!

Card -2 


Steps -

1) For this card I simply sponged the white card stock using some Distress inks & Peek-a-boo's September released Stencil .
2) Then used the Peek-a-boo's latest stitched  fishtale die to cut the vellum banner and Peek-a-boo scalloped  circle die with stitches to die cut the golden scalloped border !! 
3) Heat embossed the sentiment in gold from previously released  Positive vibes Stamp set !! 
4) Placed everything together and the card is done !! Easy right !! ;)

Card - 3 


Steps - 

1) This card is completely made with previously released products ...;)
2) Took a white card stock ..stamped the circular images from Peek-a-boo's Circular fonts Stamp Set in different shades of Pigment inks !!
3) Die cut the whole Panel with Peek-a-boo Stitched Rectangular Die and also die cut the little star & heart from Peek-a-boo' s die !!
4) Placed all in right manner and layered a pattern paper for some interest on a pink top folding card and then placed the white stamped card panel over it !! Tadda ..we are done !! I just love the simplicity of this card !!

That's all for today ..meet you all soon with some more creations!! 
Thanks for stopping by and don't forget to check this month's challenge !!

Hugs.. 
Vijaylaxmi Siyal .

Wednesday, August 31, 2016

You Inspire Me !!

Hi Friends !! ....It's time for a New challenge @ Decorate to Celebrate Anything Goes Challenge   where you may enter anything you have created as always and that's super fun & way interesting ...right ??

Sharing a simple die cut card using Peek-a Boo Designs India Stamps & Dies !!


This card is for one of a crafty friend who always inspire me in all manner !! And she is hosting her 3rd Blog Anniversary Celebration so entering this card to her Challenge !!
 
 
Thanks you all for your Love , Support & Inspirations !!
 
Hugs..
 
Vijaylaxmi Siyal

Linking it to -
1) Blog Anniversary Celebration Event-2


Thursday, August 11, 2016

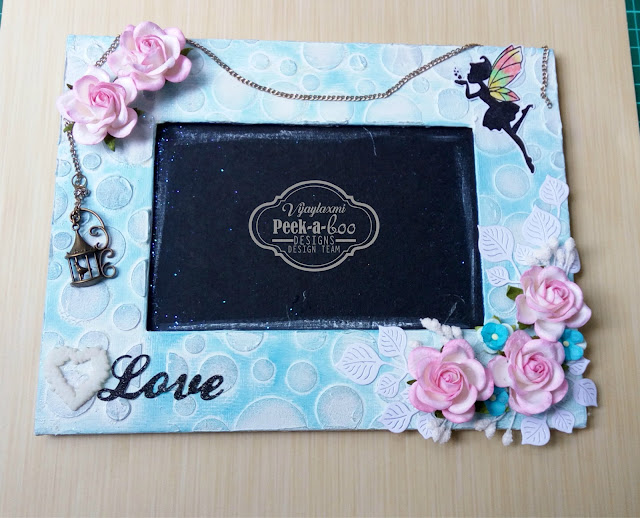
Picture Frame Tutorial !!

Hi Friends .. How you all are ?? You all must be doing great !!
Today its my turn to share a tutorial so sharing a picture frame !!
So without any delay here we go --
  

 Steps on how I made this  -

1) Take a Chipboard Photo frame .(Either Readymade or handmade )
2) Apply white Acrylic paint to cover the frame .
3) Then I Used PABD Bubbles Stencil & Texture Paste to give the frame a nice texture !!
4)  Actually I thought to add color to my texture paste & for some vintage look I added vintage photo DI and applied that brownish texture paste but after doing this I didn't felt good about the outcome & it seems like a blunder so I applied a coat of Gesso over the stenciled area !!
With a coat of Gesso -
5) Then I again distressed it with broken china DI ..now when its looking some better , I started decorating it ..!!
Some More Ink -
6) Decorate it as per your choice. I used PABD Magical Fairies Stamp Set & PABD Love Word Die Cut to decorate my frame along with some Flowers & other embellishments.
7) Hope you like my attempt.
I hope you all are submitting your beautiful entries to our August Color Inspiration Challenge !!
Products Used -
word-love Magical Fairies
bubbles
Thanks for Stopping by & leaving me love !!
Hugs ..
Vijaylaxmi.