Thursday, March 31, 2016

Love You to The Moon & Back !!


Hello friends,

It's time for a New challenge @ Decorate to Celebrate Anything Goes Challenge #7 where you may enter anything you have created. 

Here is what i came up with for the inspiration ...


Stamps Used from Peek-a-Boo Designs Stamps
1) Nyasaa 

Thank for Stopping by..

Hugs..


Tuesday, March 29, 2016

Focus Post - 3 Cards with 1 Stamp !!

Hello folks ...Its Vijaylaxmi (Shalu) here..!! 

Today i am going to share 3 CAS cards using one Stamp set - " Stringy Sentiments " !!
This is my Focus DT Post for One stamp !!
I totally loved this stamp set as it have almost all general sayings we use for our cards most. Also the stringy font gives it a lot more interest & make a card extraordinary !! :)
So here we go -


Card No - 1 

Stamps Used -
1) Stringy Sentiments
2) Lotus Delight


Steps -

1) Took a white card stock piece of  3*3" size.
2) Stamped lotus delight with pink pigment ink first then again stamped with the red pigment ink by wiping off the inks from the sides n let it be only in centered part so that it can give a shaded effect .
3) Sprinkle clear embossing power on the stamped image n heat emboss it !!
4) Repeated the same steps with other two smaller  sized lotus !!
5) Now as all three lotus are heat embossed so they can resist inking..so i use distress the whole back ground using 2 different Distress inks.
6) Assemble the whole arrangement  and then Stamped the sentiment from Stringy Sentiment. 
7) See its done ..easy peasy !!

Linking this card to - 

1) Stamplorations March Sketch & Theme Challenge  (Followed both ) (Textures - Embossing)


3) Time Out Challenges # 52 ( Inspired by flowers )


                     ----------------------- ************** ---------------------------

Card No - 2 

Stamps Used -
1) Stringy Sentiments


 Steps -

1) Took a white card stock piece of  standard card size.
2) Stamped Stringy Sentiment with pink pigment ink first then stamped the same stamp with the Black ink at different intervals.
3) Put a Candle die cut (Gifted by Priya Sondhi) to add some more interest & some rhinestones too !!
4) Its done !! Simple ..Quick n pretty !!

                           ----------------------- ************** ---------------------------
Card No - 2 

Stamps Used -
1) Stringy Sentiments
2) Holi Hai Stamp (For Balloons)


Steps -

1) Took a white card stock piece of  standard card size.
2) Distressed the upper side of CS with 4-5 colors of DI.
3) Sprayed some water from mister for water-colored effect !!
4) Stamped balloon on pattern paper n fuzzy cut them.
5) Adhere them using foam tape for dimension & added twine (Gifted by Pooja) for their Strings !!
6) Stamped the Sentiment & some star shaped sequins for finishing touch.
7) Viola ..Its done !! 

Linking this Card to -


I Hope you enjoyed today's post & Please don't forget to join us in our Current Challenge # 4 for exciting prizes & more over that , for so much fun !!

Happy Crafting !!

Hugs ..
Vijaylaxmi (Shalu)


Linking all three cards to - 


Monday, March 28, 2016

You Mean World to Me !!

Hi..Happy Monday Everyone !! :)

Sharing a quick post today with a short tutorial too !! 

Here is my card -


Made this card by following the Awesome Tutorial by Dr. Sonia !! Thank you Dr. Sonia for being an inspiration always !!
Colors N Geometrical patterns & Textures are inspired by Altenew March Challenge - Inspiration Picture !!

Used Tacky Tape (From Crafters Corner) for Masking. Velvet Flocking Powder (From Rainbow Craftykari ) is used to create textures.

Stamp Used - 
Altenew Vintage Flowers for all the flowers.
Peek-a-boo Design Stamp for Sentiment .


Here is the final result & i loved it totally !! Also happy that I could manage tp participate in Dr. Sonia's Celebration n followed one of her amazing tutorial !!


Linking it to - 


2) Altenew March Challenge # Places abroad France
( Inspired from colors, pattern n the texture of grass )


3) Stamplorations # CASEplorations - March 


(Cased the wreath idea )


Tuesday, March 22, 2016

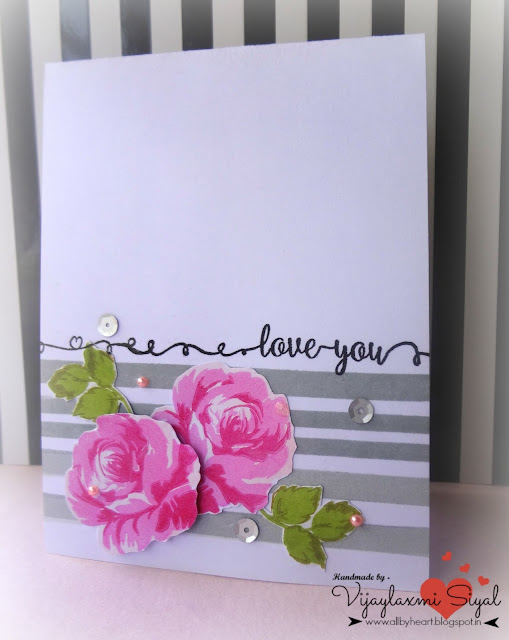
Love You !!

Hi Friends...!! Sharing a CAS Card again Which i made for few challenges !! This is my first trial with Altenew Vintage Flower stamp set n loved the way the roses turned out..!! 


Stamps Used for this Card -
1) Peek-a-boo Designs India - Its Plaid Time 
2) Peek-a-boo Designs India - Stringy Sentiments 
3) Atenew - Vintage Flowers

Here are some steps to define how i made this card -
1) Took a standard sized Neenah White CS .
2) Stamped the Solid lines from Plaid Stamp set in London fog Memento ink .
3) Stamped Layered Roses from Vintage Flowers stamp set using 3 different shades of Color box Pigment inks & leaves too with green shades !!
4) Placed them accordingly n added a foam tape on one of the rose to give it some dimension.
5) To add interest added some grey sequins & pink small pearls here n there .
6) Finally stamped the Sentiment from Stringy Sentiments Stamp set !!


Hope you liked it !!

Created it using the following themes in mind -


3) Altenew March Challenge # Photo Inspiration ( Picked the Colors from the Inspiration Picture & Also created the striped BG for geometrical pattern)


5) MHK Designs March-April Challenge (Used Colors From the theme board )


Friday, March 18, 2016

Amazing !!

Hello everyone !! Sharing a quick & colorful card today made for my Dt Post @ Decorate To Celebrate Anything Goes Challenge # 6  using Masking & Smooshing Technique !! 

Here it is --


For this Card i followed these steps -
1. Took a watercolor paper of standard card size !!
2. Stamped the  "Girl With Wings" stamp from HOTP on masking paper n fuzzy cut the image !!
3. Now place the masking paper where you wanted to stamp your image !! I choose the center !!
4. Then i took a piece of acetate n dabbed it with various colors of Distress Inks n then put that acetate on or around the masked area !!
5. When i found my background pretty , I stopped smooshing & remove the masking paper too !!
6. Now stamped the girl at the blank masked area n its done..!!
7. To add more interest & finishing touches I added some silver string with a pearl on top ..some sequins here n there & a perfect sentiment from Altenew Labelled Love !!

Sorry i forget to click all the Steps but i tried my best to explain the process in above steps & yes still you want to know anything ..please drop a query in comment section.

Thanks for stopping by n encouraging me Always !!

Hugs..

Linking it to - 


Friday, March 11, 2016

Stationery Box Tutorial + 3 Colorful Cards !!

Hi Everyone..How you all are doing ?? Today am going to share a Pictorial with all of you !! Yes now days i am trying to get out of my comfort zone & trying different things that with tutorial too !! ;) 

So now to my Tutorial -

I Made a Stationery Box and Used the most beautiful n versatile stamp "the Damask" Set!! Here you go - 


I Used Peek-a-boo Design's Black Card stocks which is very very sturdy & good for making albums n boxes of all sorts !! Also Used White Textured card Stock for stamping (as a Pattern Paper) Though this one is also very sturdy n having 300 gsm but i loved the textures & its good for stamping too !!The Rose Gold Card Stock from which I Made the Bow N Hearts is just awesome !! Do check out all the Card Stocks & Stamps Here!!


Enjoy the pictorial in which I mentioned all the dimensions but feel free to adjust them as per your needs.
and if you have any query do ask me through comments here ..i would love to answer !! :)

>> Take a 12*12 " Card Stock !! Score all along as per directions in pictures.


>> For Lid dimensions are given. Also see how i created my own pattern paper using Damask Set.


>> Paste all the cut pieces of pattern paper to decorate the box !!

So guys i think i didn't bored you much & you really liked this attempt of Mine ?
Dont go away ...i am sharing a bonus tutorial too ---- yes this full post is picture heavy ..so just relax n watch it !! ;)


Card - 1 : As Holi is near so i thought to share a colorful Holi Card using " Holi Hai " Stamp set from Peek-a-boo Designs India !!
I Used a little bit of masking technique here . Let the pictures say all --


For finishing touch ups I added some colorful sequins which is my latest obsession ;)

Card -2 :  For this card i Used Jennifer McGuire's Over lap Stamping using " It's Plaid Time Stamp" from Peek-a-boo Designs India !! This stamp is also very very versatile & in so much trend!! We can create our own pattern papers with it !! I used Colorbox Pigment Inks for stamping. Firstly choose a point from where you wanna start your stamping ..i choose the top most corner so can reduce the chances of mistakes ;) Then keep on stamping in the same diagonal position with different colored inks.... .& while stamping further, just keep a single thing in mind that we need to overlap the previous stamped strip a little bit & when we do the same ..the two ink will give a very cool n beautiful effect after mixing with each other. 


See the steps --


Added some Heat Embossed Lotus From " Lotus Delight" Stamp Set and the Sentiment from Latest released Mini Stamp " Pixie Dust " .For final touch up added heart shaped stones from my stash !! See how colorful n classic it is looking !!

Card - 3 : Haww...finally the last one :p For this Card I again used " It's Plaid Time Stamp" from Peek-a-boo Designs India to build my background..this time i used solid wide strip as well diagonal strips stamps to create this beautiful n very colorful background with Pigment inks !!


 Have a look at the steps --


To complete the card i used " Be Good Mini Stamp Set " .Added some paper flowers and tiny heart shaped stones to finish it up !! Keep it as much simple as i could and i really loved the whole process of background building !!

I hope You Enjoyed this whole post & Please do not forget to participate in this Month's Challenge - Rainbow With Cloud : Create a Set !! 


 >>>> Linking Card No-1 (Holi Card)---   

1) Paru's Card Making Challenges : March-Challenge.


 >>>> Linking Card No-2  


>>>>Linking all 3 Cards To -

1)  A Blog Named Hero - March Challenge : Rainbow !!


Hugs...


Wednesday, March 2, 2016

Shadow Box Styled Name Frame !!

Hello Everyone..  haha ..you might be wondering that what had have happened to me that i am continuously posting on my blog..??
Hey guys nothing wrong is here ..just doing my duties !!
So today i am sharing the DT Post for Another Fun Challenge @ Decorate To Celebrate Challenge # 5 - Anything Goes !! 


And I am sharing today a very Beautiful & Boyish Shadow Box Styled Name Frame made for a 8 year old Boy who is crazy for Sports & Music !! I almost put all her favorite things which he described to me !! As you could guess the Miniature Piano , Basketball Hoop & Mini Basketball all are made by me !! Even the bricked background is created by cutting paper into small rectangles and then distressed each individually with Tumbled Glass DI..!! Then added a banner made with scraps of various Pattern papers for more interest !!The name "KANAV" is also handcut on glitter foam sheet !!

Other MDF articles, Mulberry Flowers, Miniature Pots on both the corners , Glass bottle & pearls inside , Metal Charms on Piano & on wall are Store bought !!


Some Clicks of the corners -


Hope you liked the creation !! 
Don't forget to participate in the current Challenge # 4 !!
Thanks for Stopping by & Leaving me Love !!
Hugs..

Linking this frame to - 
1) NBUS Challenge # 6 (Used Newly bought Twine, Mini Pots & Tumbled Glass DI )