Showing posts with label Tutorial. Show all posts

Tuesday, October 18, 2016

Mobile Case Tutorial + 1 CAS Card !!

Hi friends ..this is Vijaylaxmi Siyal this side !! Yeah i know i am MIA since long but there are so many reasons for being that..!! Anyways keep this story aside and lets talk craft .. :) I really missed craft this time and believe me its very hard to get back and bring that mojo back ...i struggled a lot this time while creating these projects so pls bear me with my silly creations..!! hope you like them !!


So lets move ahead -


Here is the -- Felt Mobile Case !!


Step 1 : Take Felt Sheets as per your choice of colors... i chose Black , Red & Lemon Green.


Step 2 : Cut the Black outer most sheet using PABD Dual Leaf die.


Step 3 : Now stick the Green felt sheet beneath the die cut black sheet for some pop of colors ..i used Fabric Glue here to stick both sheets.


Step 4 : Now cut some red leaves from the same die and place them in the negative die cut space black felt sheet.


Step 5 : Stick all the leaves with the help of Fabric glue & let them dry completely..You can see the glue in my pics :p


Step 6 : Now take some Red Embroidery thread and stitch both the front & back black felt sheets together. I am not in stitching much so don't know the name of this stitch :p  we are done ...!! Easy right ...?? If you want you can add a button or strap to make it more secure ...i am going to do that soon.


PS - I would like to thank Jasleen for inspiring me with her amazing Felt Creations..!! 


Products i used for this Project from Peek-a-Boo Designs -


Now move on to the next card in which i used Inlaid Die Cutting for the first time ..& really find it so cool !!


Steps - 
1) For this card i distressed a white card stock  with some random colors of DI and then Die Cut them using the October Released Swirled Flourish Die & Thank You die 
2) Then Cut another white CS panel using Rounded stitched Rectangle Die .
3) Then placed the Flourish Die & Thank you Die on this stitched white CS in a pattern and run thru it from the Big Shot.
4) Now comes the tricky but fun part is to arrange all the colored die cut pieces to this white die cut piece. Its just like solving a puzzle ...!! So fit all the pieces in the negative spaces . Placced some matching PABD Enamel Dots here n there for more charm.
5) Tadda ..!! We are done ..its ready ..sweet n simple  !! Quick too :p


Products i used for this Project from Peek-a-Boo Designs -


Thank you all for stopping by ..!!

hugs..
Vijaylaxmi Siyal

Thursday, August 11, 2016

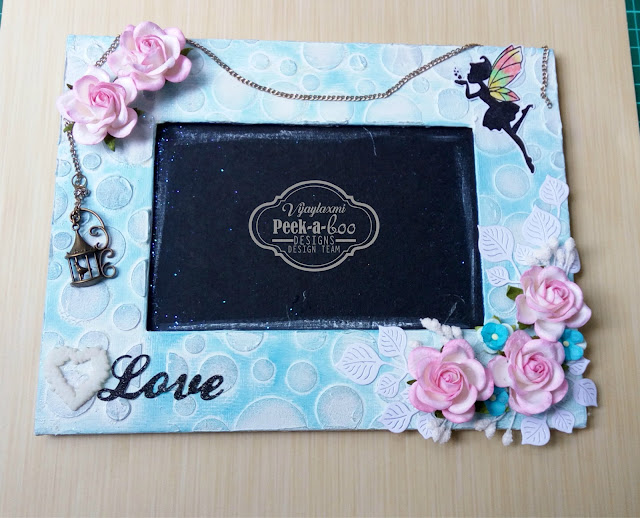
Picture Frame Tutorial !!

Hi Friends .. How you all are ?? You all must be doing great !!
Today its my turn to share a tutorial so sharing a picture frame !!
So without any delay here we go --
  

 Steps on how I made this  -

1) Take a Chipboard Photo frame .(Either Readymade or handmade )
2) Apply white Acrylic paint to cover the frame .
3) Then I Used PABD Bubbles Stencil & Texture Paste to give the frame a nice texture !!
4)  Actually I thought to add color to my texture paste & for some vintage look I added vintage photo DI and applied that brownish texture paste but after doing this I didn't felt good about the outcome & it seems like a blunder so I applied a coat of Gesso over the stenciled area !!
With a coat of Gesso -
5) Then I again distressed it with broken china DI ..now when its looking some better , I started decorating it ..!!
Some More Ink -
6) Decorate it as per your choice. I used PABD Magical Fairies Stamp Set & PABD Love Word Die Cut to decorate my frame along with some Flowers & other embellishments.
7) Hope you like my attempt.
I hope you all are submitting your beautiful entries to our August Color Inspiration Challenge !!
Products Used -
word-love Magical Fairies
bubbles
Thanks for Stopping by & leaving me love !!
Hugs ..
Vijaylaxmi.

Saturday, June 11, 2016

Peek-A-Tute Day : Desktop Quotation Display !!

Hello Crafty souls.. ..Its Vijaylaxmi here & today i am sharing a Tutorial on making a "Desktop Quotation Display"


Steps on How to make this -


  • Stamps i used here - (From Previous & Latest Releases)


  • Material Needed - Chipboard, Pattern Paper, Card Stock, Paper Cutter, Binder Rings, Glue, Embellishments to Decorate.
  • Cut A Window with the help of cutter on two chipboard pieces.


  • Like this. You can cut as per your size requirement.


  • So after cutting & punching ..the chipboard will be like the same as in below picture -


  • Now cover the Chipboard pieces with 12*12" Pattern Paper of your choice. I took a neutral colored background paper. 


  • Cut a "X" slit in the window so that we can fold the paper backward & window can appear neatly. (See the above pic)
  • Now the whole stand will look like this.
  • As we already punched the Chipboard so now its easy to poke holes again after covering with Pattern paper. 


  • I stamped the Gorgeous Nysaa on different pattern papers to form its beautiful dress & colored the upper body with water color pencils.
  • Put this pretty girl on side panel of this desktop stand with the help of 3D foam Tape. I just love the way she is blushing ;)
  • Then added a mdf fence.


  • Decorate it as per your choice ..i used Mulberry Flowers & handmade Flowers (RAK From Pooja ).
  • Also used Pie Lane butterflies & Some Sequins.
  • Then with the help of binder Rings i added my quotations .
  • All the quotations are from "Positive Vibes Stamp Set" ..Our latest Release & a Must have stamp set..:)


  • You can add as many quotations you want & can flip it on daily basis for your daily motivational dose :p


Yay..we are done !!


Have a great day !!
Thanks for stopping by & Check out this month's Challenge with a Blog Hop # Anything Goes...!! Yes its anything goes so don't forget to link up your beautiful creations for more fun & prizes.

Hugs ..
Vijaylaxmi Siyal
Friday, May 27, 2016

Black Magic Cards with Two Variations !!

Hi Friends...how you all are doing ?? Its Vijaylaxmi Siyal and sharing a very fun technique with two variations !!

So today's tutorial is based on Black Magic Technique !!

This summer is already very hot & killing us with the high temperature ..so i have one cool card too for you guys at the end of the post..but before that see my Black Magic .. ;p ..LOL.. Just kidding ;p

So now come back to the tutorial...here it is step - by - step --

1) Black Magic Technique With Emboss Resist & Black Ink -


Steps -

1) I used the following supplies for this technique -
- PABD Black Card Stock 
- PABD Swirly Lines BG Stamp
- PABD Bold Hugs 'n' Love Stamp Set
- PABD Acrylic Block 4*6"
- 3-4 Distress Inks
- Clear Embossing Powder
- Versa-Fine Watermark Ink
- Heat Gun
- Violet CS for the base
- Baby Wipes 

For this card i took a white cs of 4*4 " ...Distressed it with 3-4 colors of DI ...!!


2) Then i Took PADB Swirly Line BG Stamp & Using PABD Acryilic Block, Stamp it on the colored panel with Versa-fine Watermark Ink.


 3) Sprinkle Clear Embossing Powder & then Heat Set it !!


4) Now comes the fun part -- I took my Momento Dye Ink Pad & Rub that directly on the CS until it covered all the panel fully black ..!!


5) Then Using wet baby wipes i swipe off the Ink from the cs and there the magic happens..:) All the embossed area does not absorb the black ink and they came out clear and hence the color under them :)
Look how pretty the whole Background :)


5) I tried the same Technique with Versafine Onyx Black Ink & After wiping off the ink with baby wipe this was the result !! And i am not impressed with this one so chuck it..!! Versafine doesn't work for me :)


- Stamps Used For the above Card - 

2) Black Magic Technique With White Pigment Ink & Pencil colors -


Steps -
1) I used the following supplies for this technique -
- PABD Black Card Stock 
- PABD Peonies Love Stamp set
- PABD Acrylic Block 2*3"
- Pencil Colors 
- Colorbox white Pigment ink
- White CS for the base.


2) Stamped the solid peony with white Pigment ink on Black CS from PABD Peonies Love Stamp.


 3) This is how it looks after stamping the all elements. 


4) Start coloring using pencil colors only when your white Ink  dries completely...i didn't wait for its complete dry so did a mess ;p But no worries you can use black pencil color to cover all silly mistakes ..magicccc ;p


 5) Heat embossed the sentiment From PABD Awesomeness Stamp in white in center ...!! Taddaa..we are done ...mat it on the card stock with Silver glitter stripes on both sides & some blings for extra touch !! 


I hope you enjoyed this Tutorial & Do try any of these technique but don't forget to share with us !!
Stamps Used to create this card -